9. Checks & Inspections
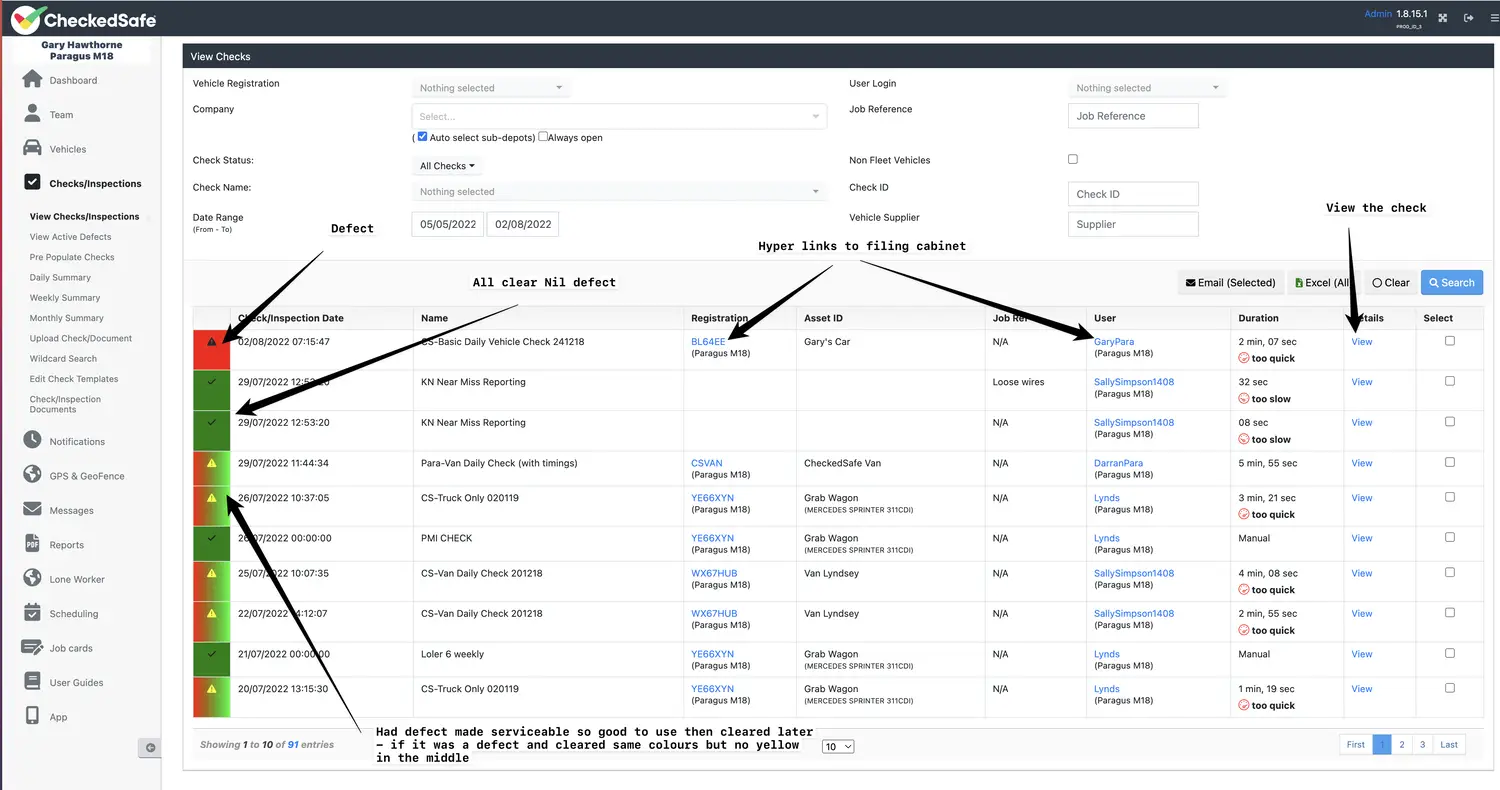
The core view section of the system - this is your go too area for compliance on checks
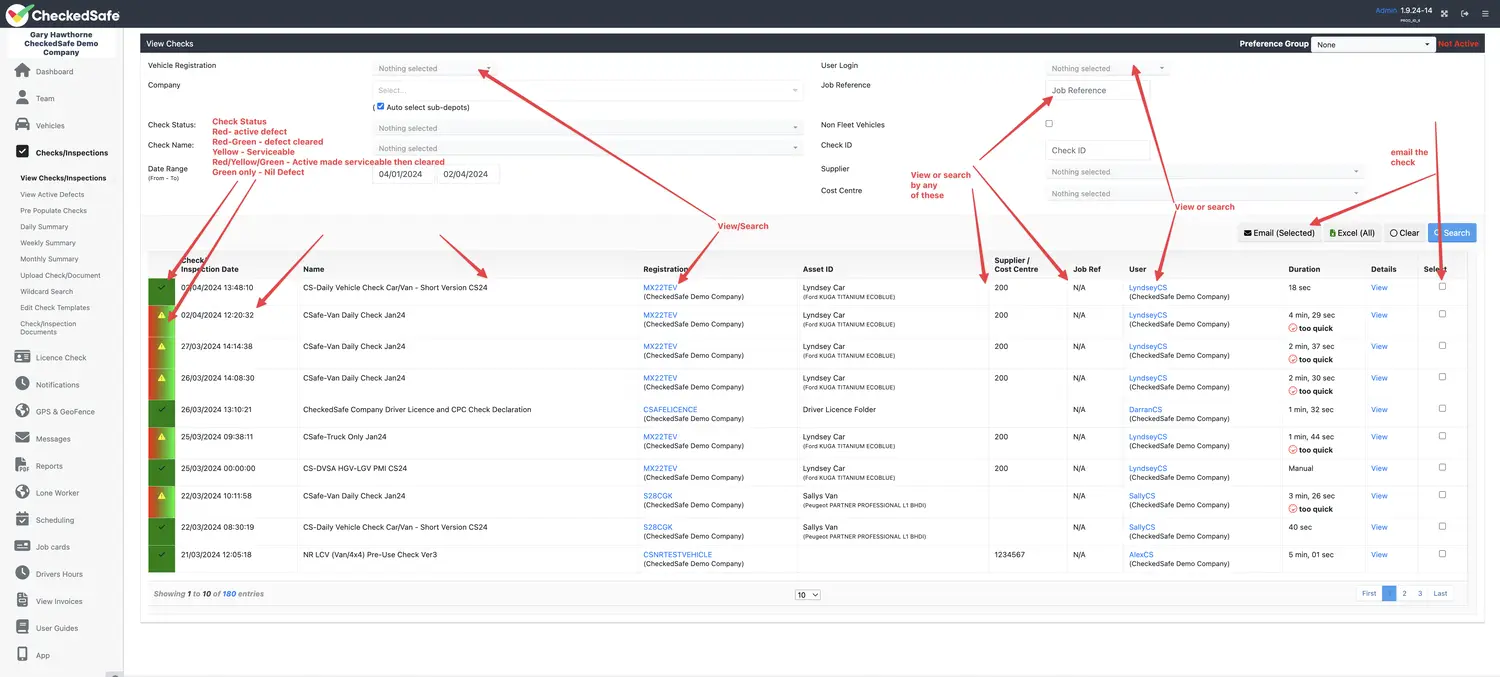
This section you can view all your current checks a great page for a full overview of you daily checks.
You can Filter by:
- Vehicle Registration
- Company (depots) if you have regional depots you can view all or individual
- Check Status (use the drop down for All checks, No Defects, Active Defects, Active Serviceable, Defects Cleared, Defects and warnings Cleared
- By user Login
- By Job Reference (if used)
- Non-Fleet vehicles
- By Check ID every check if you look will have a unique ID number at the top of the check under the “Checked By” name
- By Supplier
The data on this page provides information by date/time, check name, vehicle/asset ID and hyperlink, user ID and Hyperlink, timing of the check and a hyperlink to the check (View). You can also select this or multiple checks by ticking the select box and you can email to anyone (multiple emails must have a comma separator).
The colour coding on the left of the main page is:
- Green – Nil Defect
- Red fading to Green with a tick is initial defect but straight clear
- Red fading to Green with a Yellow triangle is a defect that was made serviceable then cleared
- Red is Defect still active
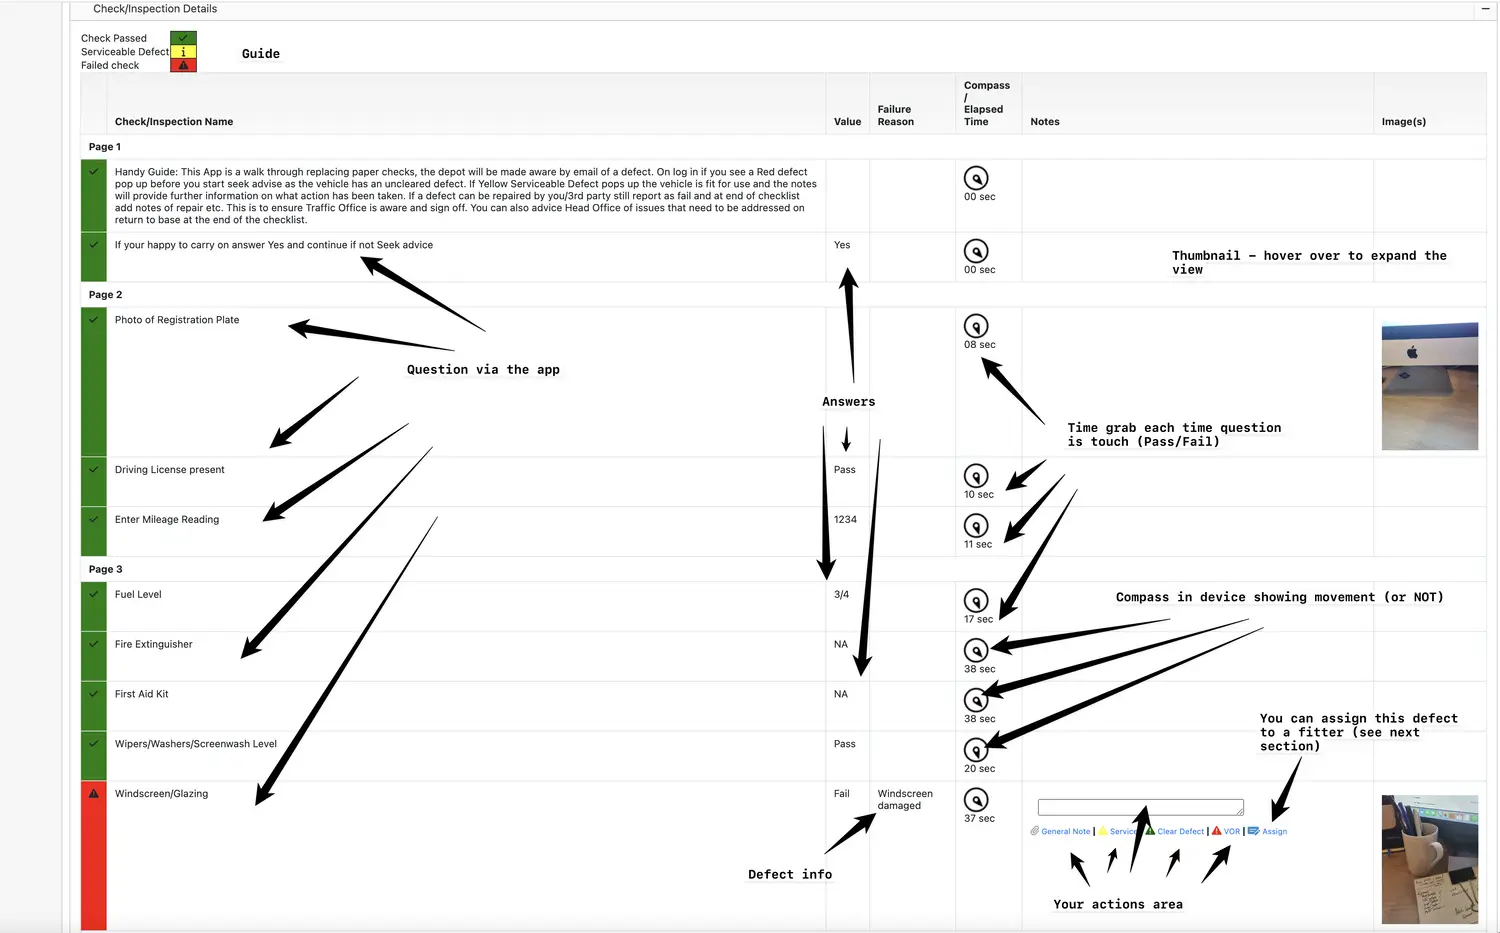
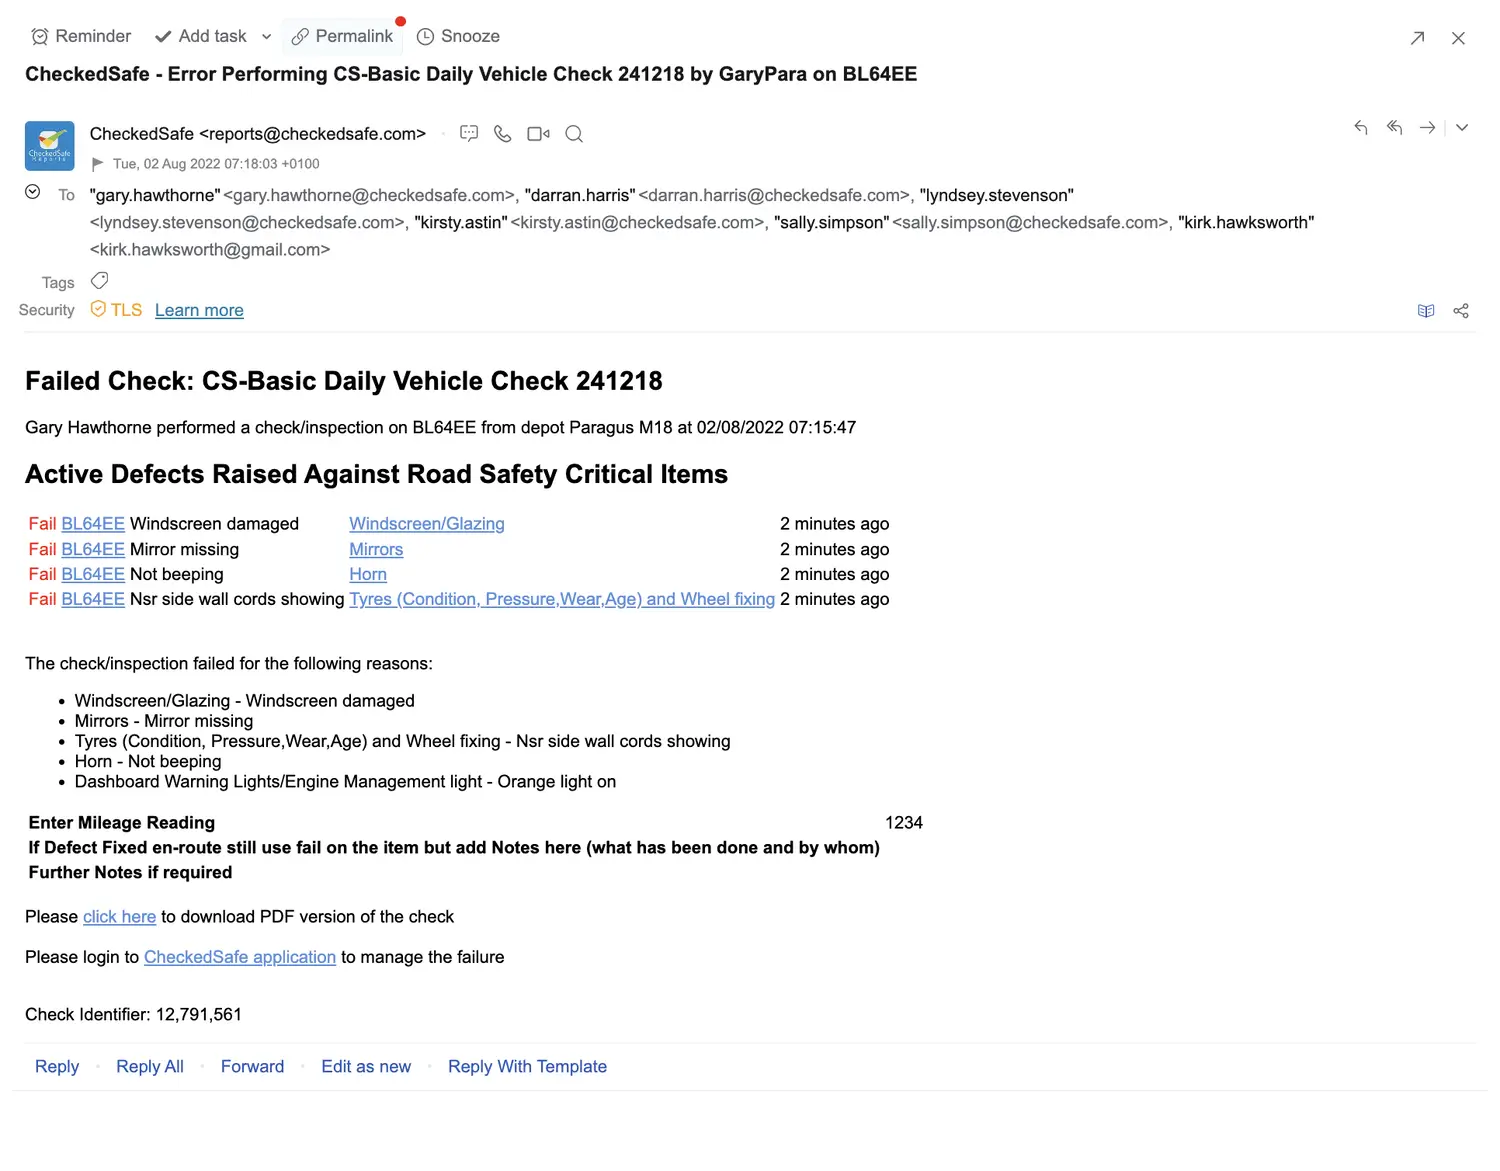
Viewing Check detail
From the view checks page you can view the details of any check by clicking the blue “View” link at the far right of the table
The top section provides details of:
- Where the user did the check (Map)
- User details (hyperlink back to folder)
- Vehicle details ((hyperlink back to folder)
- Send a quick message to the user
- Timing of check and indication is slow or fast if you have preset times
- Thumbnail photos
- Options to View Gallery (expands the thumbnails), Generate PDF Report (Summary), Generate Excel (Summary), Check as PDF (All Images) – PDF with all photos, Check as PDF (Selected images) – tick the images you wish to include on the PDF, Email Check – email the Check and ODF to anyone you wish
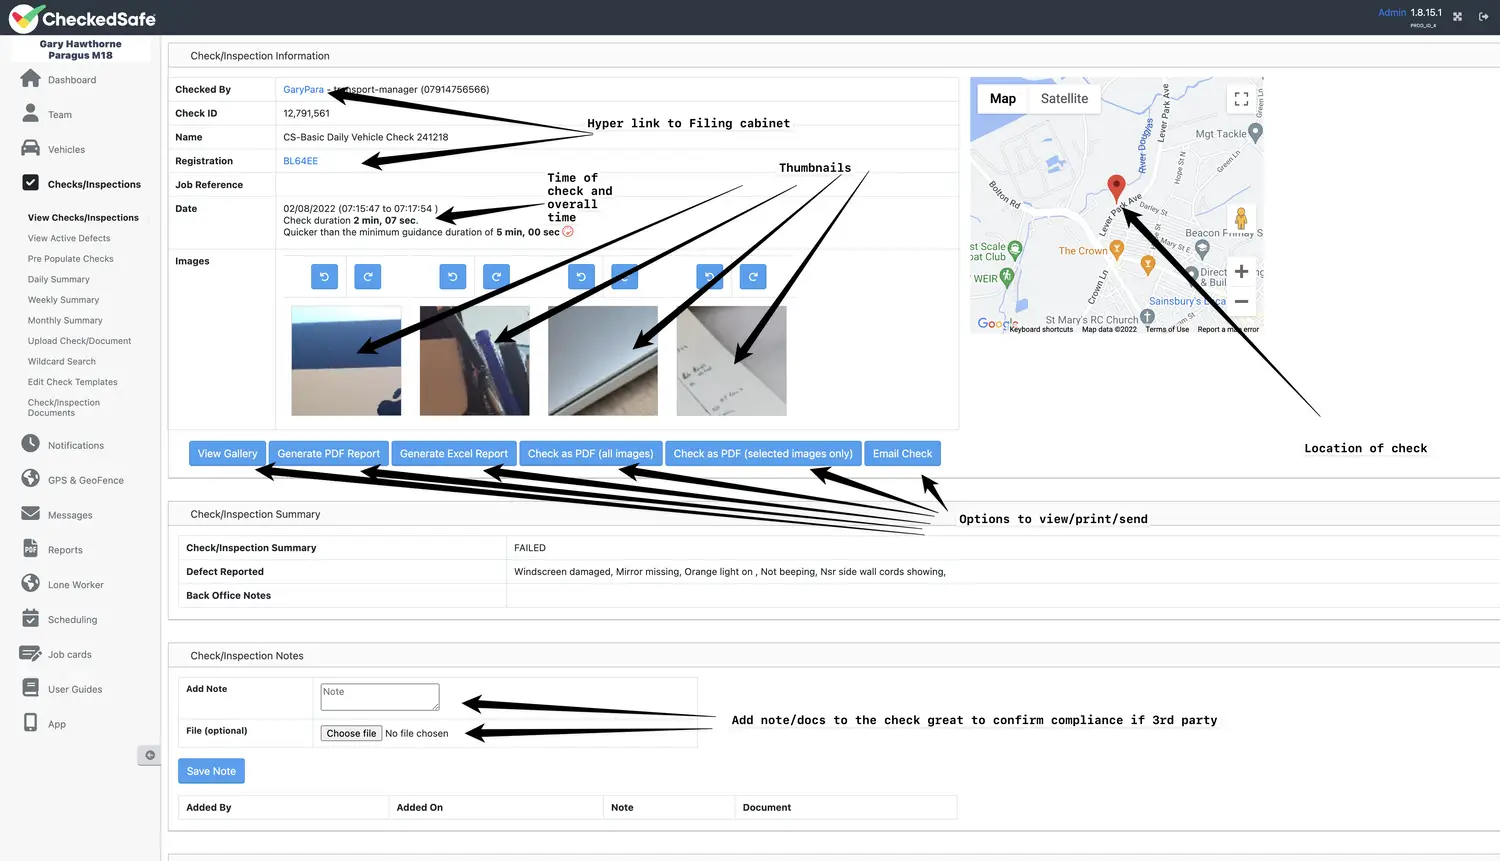
The next section indicates a breakdown of the viewable/printable report:
- The questions
- The answers
- Any defect information reported
- Time stamp each time a question is answered
- Compass movement (or not)
- Managers area for input as to actions against defects

The final view area of the check provides detail of:
- Device used
- Model
- Android or IOS version
- App version
- Camera permission
- GPS permission

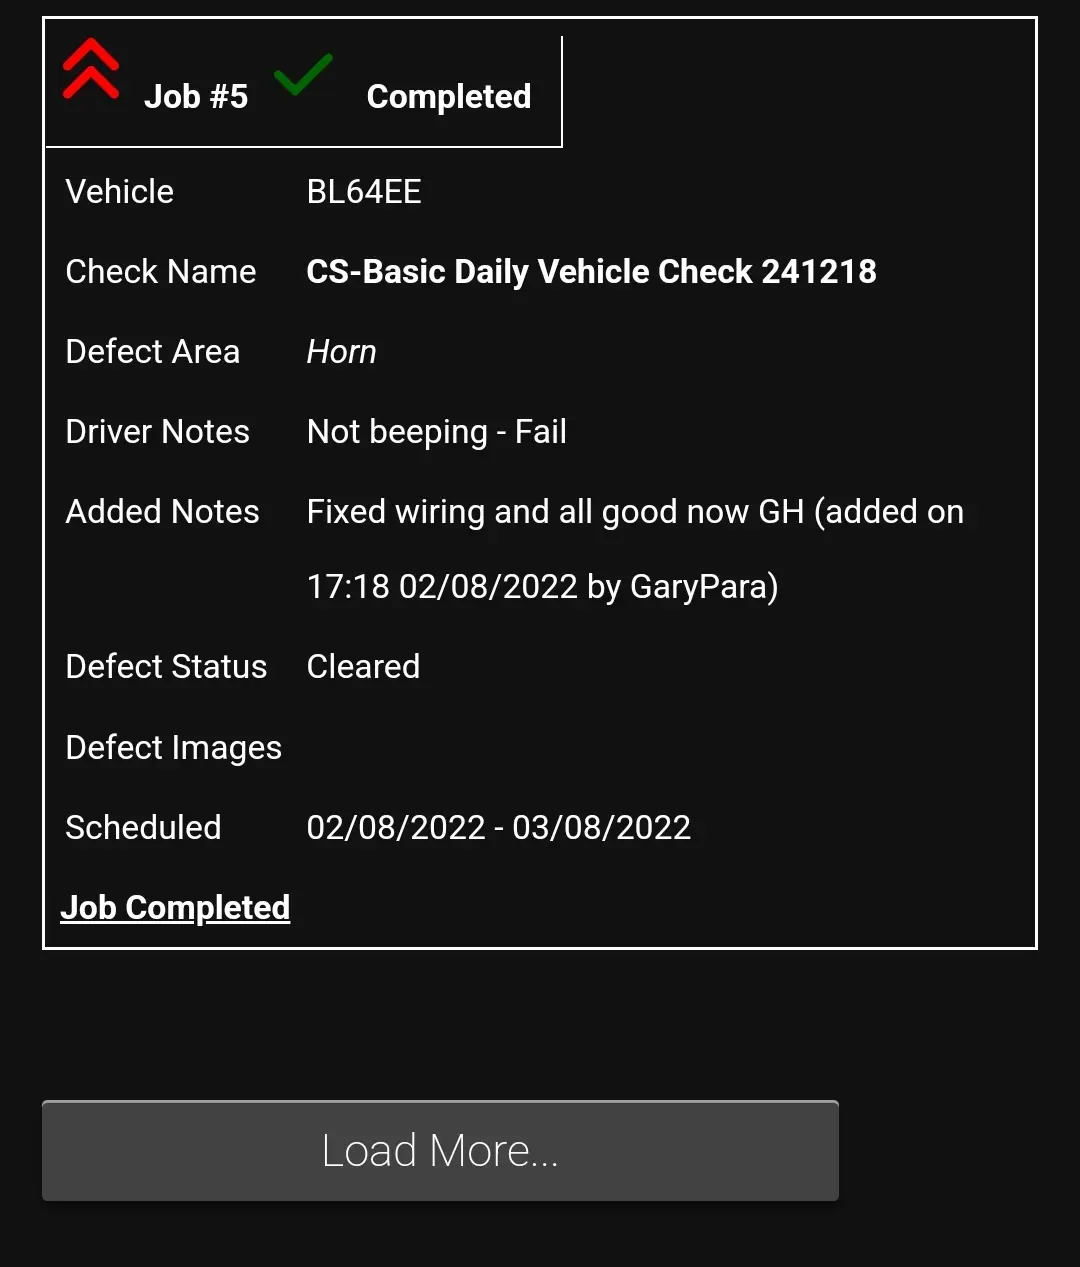
Dealing with the Defects
This section details how you can deal with the defects in line with compliance guidelines
Defects require immediate attention by a qualified person(s) and these can be:
- Email sent out to whoever requires the notification from which tasks below can be completed
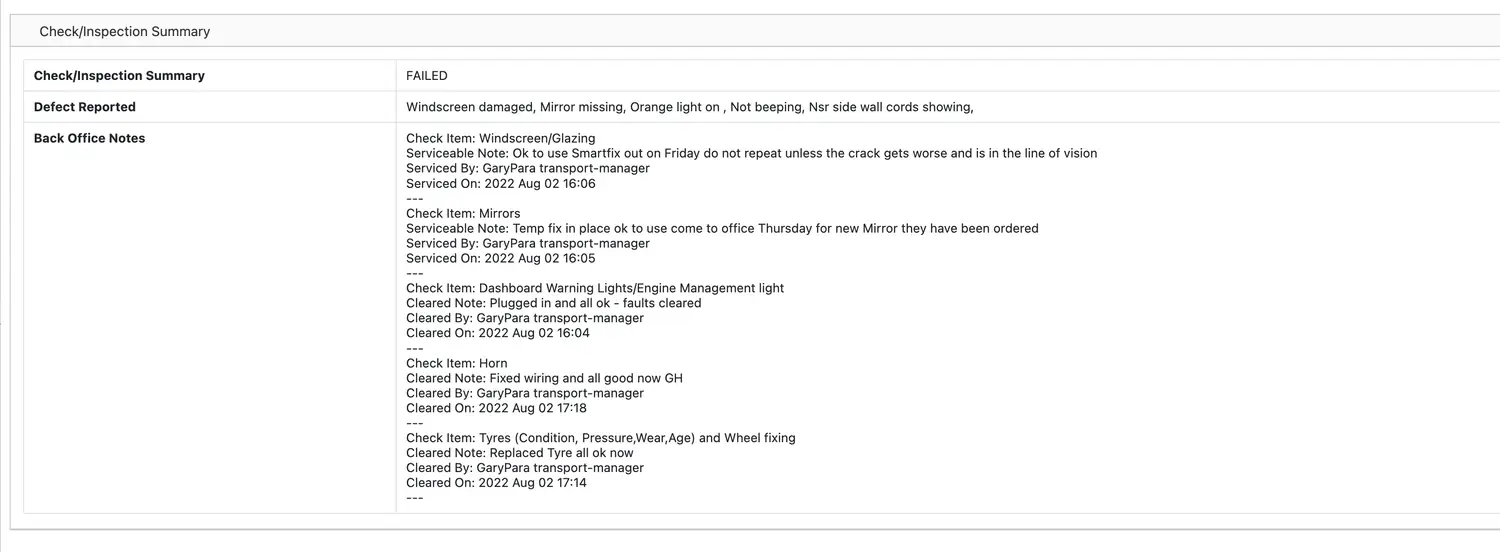
- Cleared as repaired
- Made Serviceable – still a defect but the vehicle/asset is fit for use and will be fixed/updated later (with this in mind its useful to put as much information into this as possible including actions for the driver such as “This vehicle is fit to use, do not repeat unless defect is worse” that way you will not get a build up of unnecessary repeat defects. The driver or any driver logging into that vehicle will see that defect as serviceable and work accordingly
- Defect open – any driver logging onto a vehicle and a red defect pops up they should not be taking that vehicle they MUST seek advice
- Assign the defect to someone for action – once this has been assigned the person will see it on their device when they log in, they can take action and update from the device, the manage will then see what has been done via the back office – (the same applies if the person logs into the back office and undertakes the same process as a job card completion

Status of defects
Once actions have taken place you can see immediately the status changes on each defect, you can filter all these screen by vehicle by Defect, Serviceable, Cleared – this view is filtered to just look at the defects line by line NOT the actual full check – you can see the full check if you click View at the right side of the screen

Summary of Compliance
At the top of the view check area you will have seen a summary this now starts to flesh out summarising the actions taken and tagging date/time and user so you have a full trail of compliance

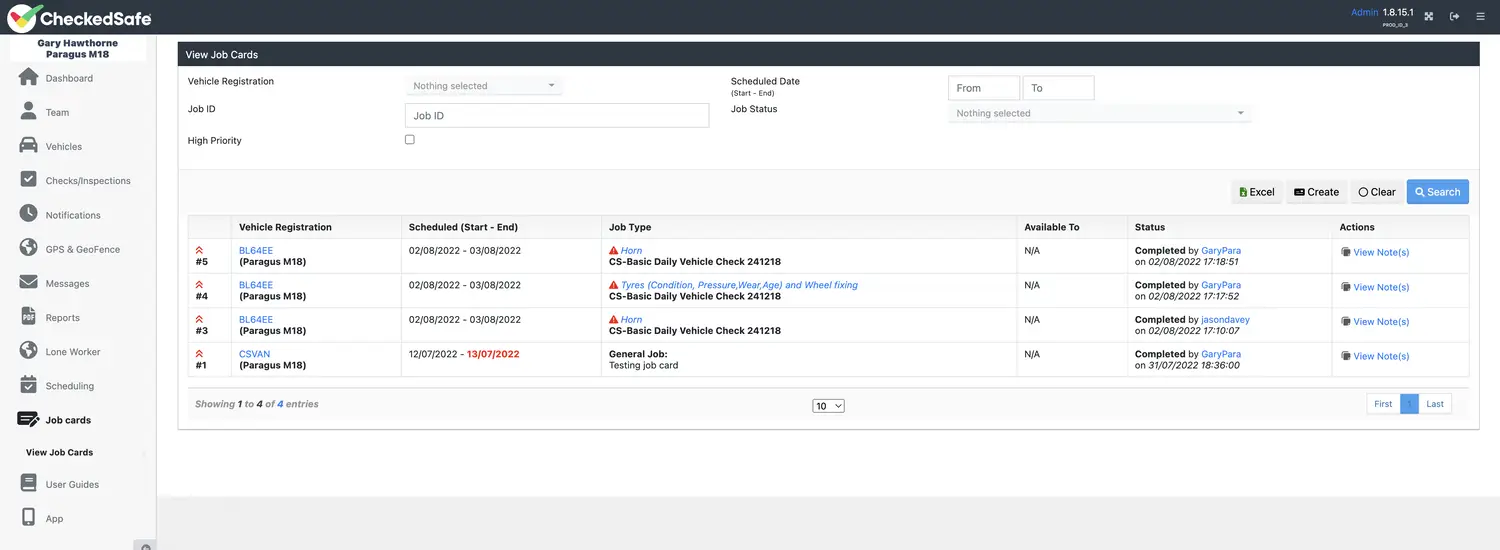
Assigning Jobs
Allocating tasks from Defects to users via back office to the app
You can also assign checks to any app user who has permission for job cards on there device – this allows remote staff to log onto the app take appropriate actions and action the defect once this has been submitted via the app it will auto update the back office so the Manager can see what the user has done to update the defect.
Either open a check or filter all open defects at the far right where you would enter actions you will see “assign” click that you get another box pop up as below – fill in the relevant sections and create – that send the job to the app user and your good to go.

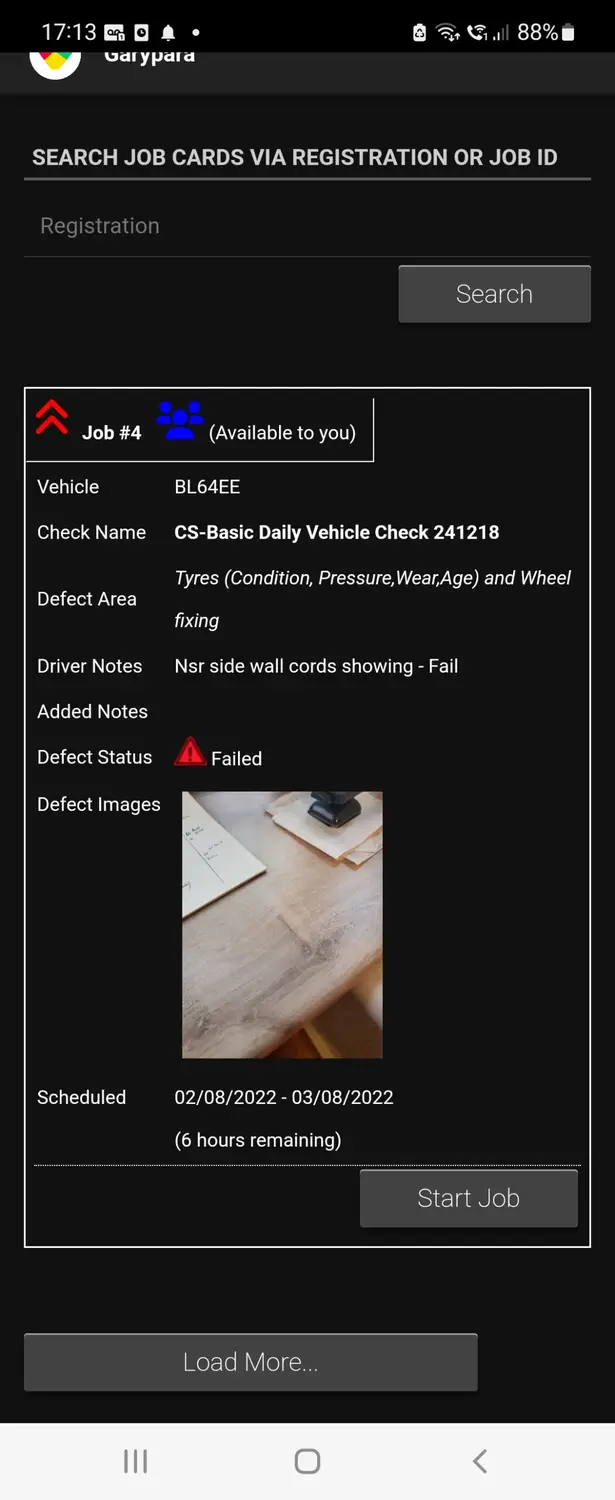
App user - how to use the Job Card on the App
Once the Job card has been assigned it will appear on the users handset they can choose to take that job or reassign it – assuming they take the task they then record the actions accordingly.
On the main start page of the app there will be an option for Job Cards click it and you will then get to the next screen its straight forward
- Start Job
- Add note in notes box
- Update status – add note – make serviceable (yellow) – clear defect
- Optional photo
- Mark job as complete
- Update
- Receipt of the job will then appear on the phone
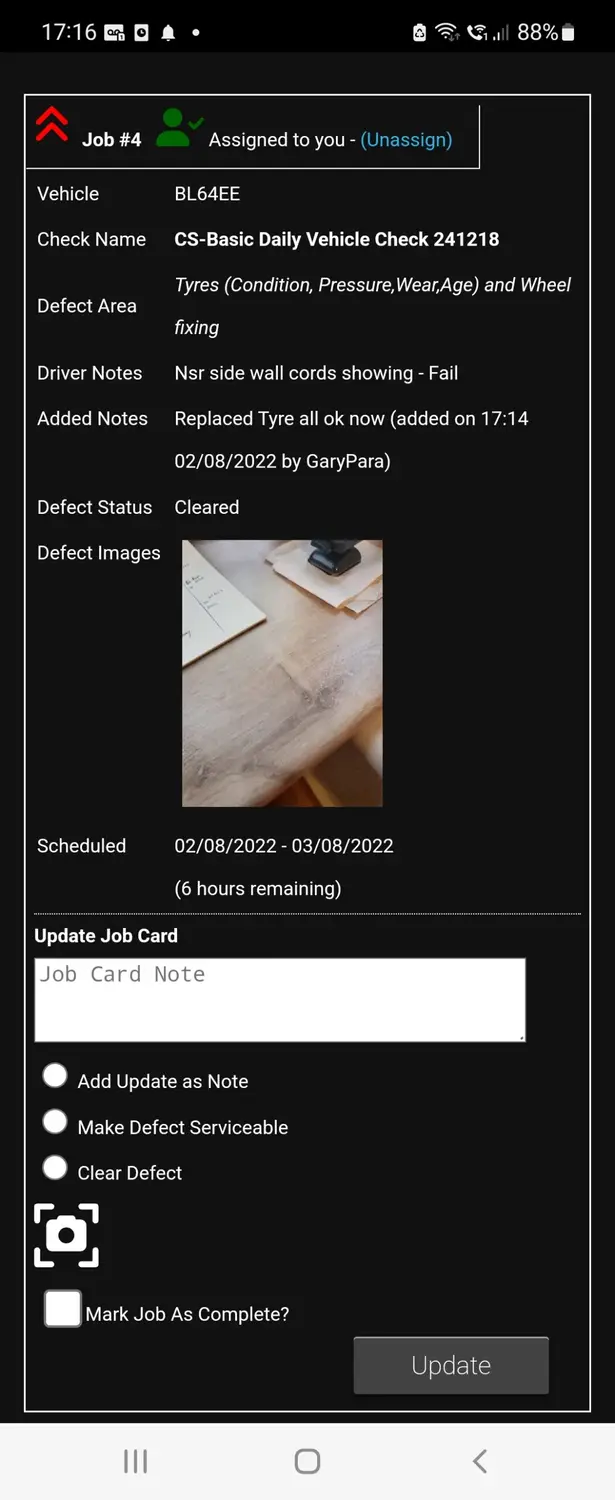
Back office update from the Job card App
Once the Job card is completed by the app user the back office will be updated and the compliance loop is complete – just as it would be if you went in via the back office portal this is just another way of managing defects
Manually create job card and push out to the App user
You can create a manual job card unlinked to any defect – once created you can assign and the process follow the same flow as above with the user
View Jobs in Calendar view
Job Cards Calendar View
It is now possible to view Job Cards on a Calendar view.
The Job Card Calendar View can be accessed via the standard Job Card table view screen, and then selecting the “Calendar View” radio button:
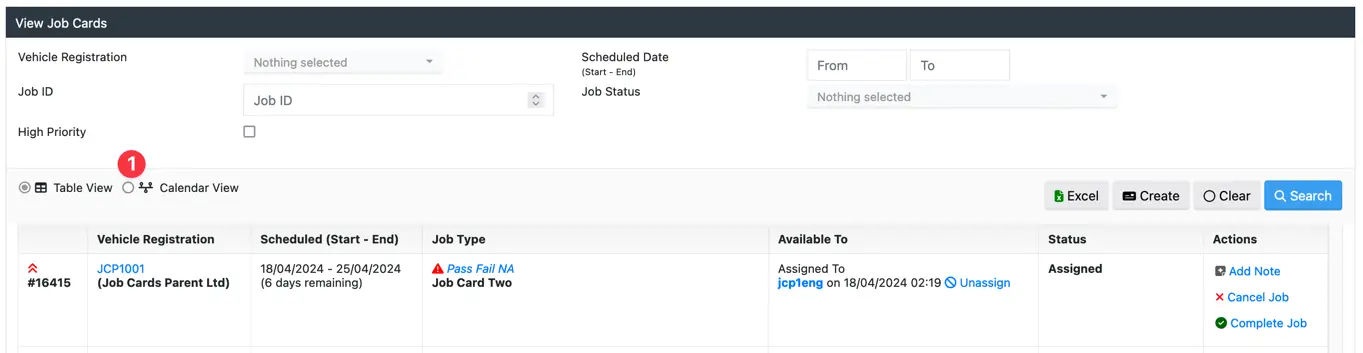
Once selected, the Calendar View will be displayed, which will be centered around today’s date:
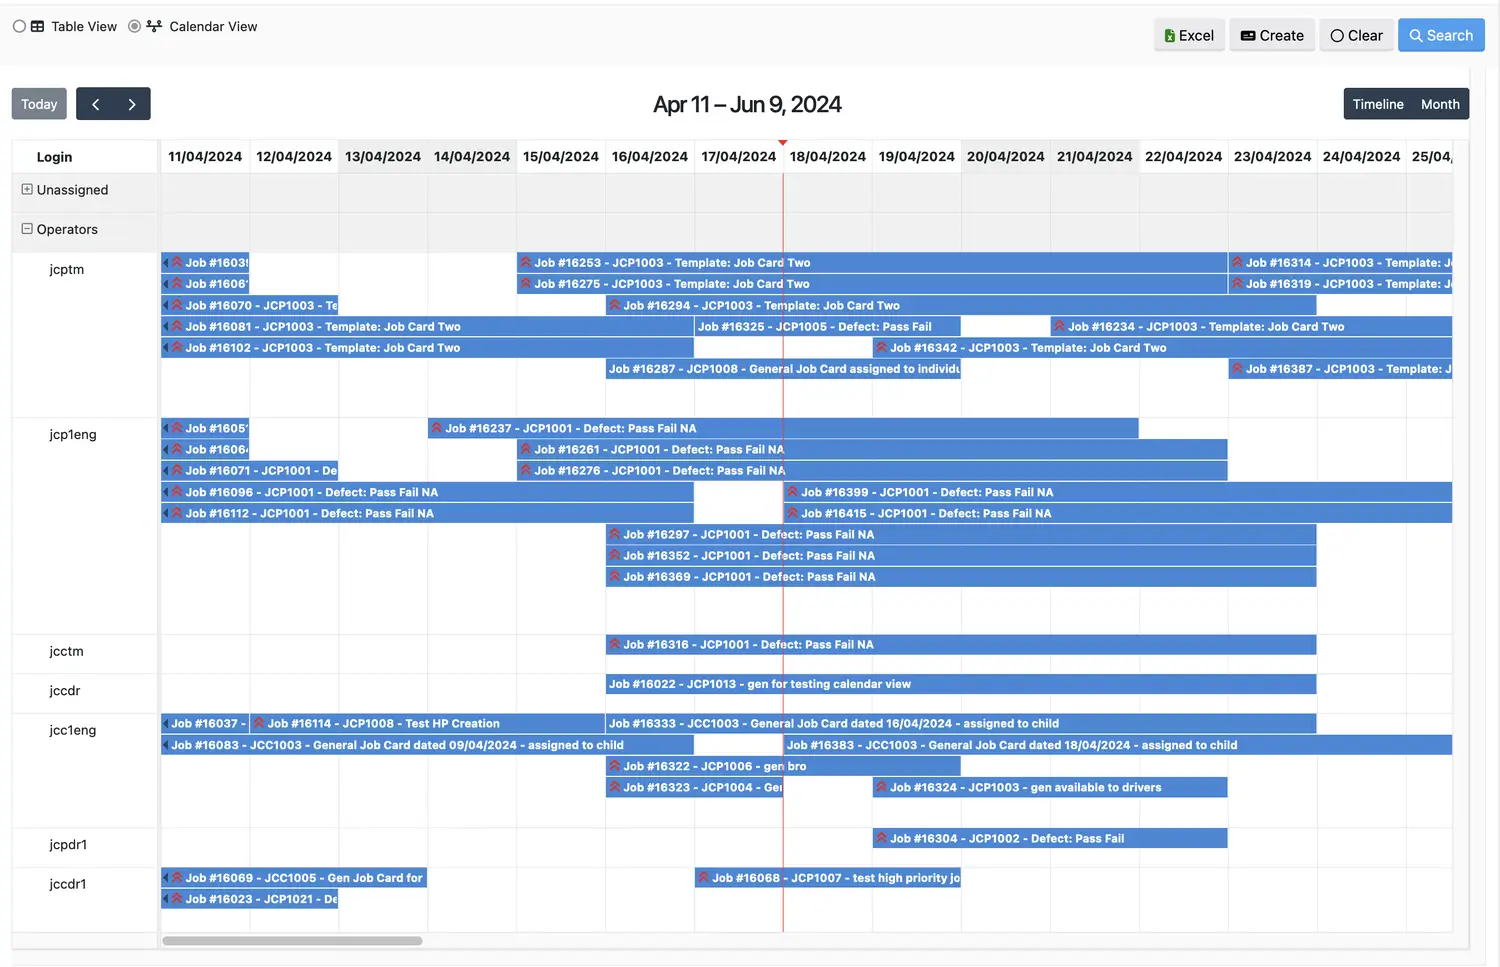
Each Job Card can be reassigned to a different User via dragging and dropping an event to a different User. Drag an event horizontally to change the Start and End Date of the selected Job Card.
High Priority Up Arrows indicate a high priority job
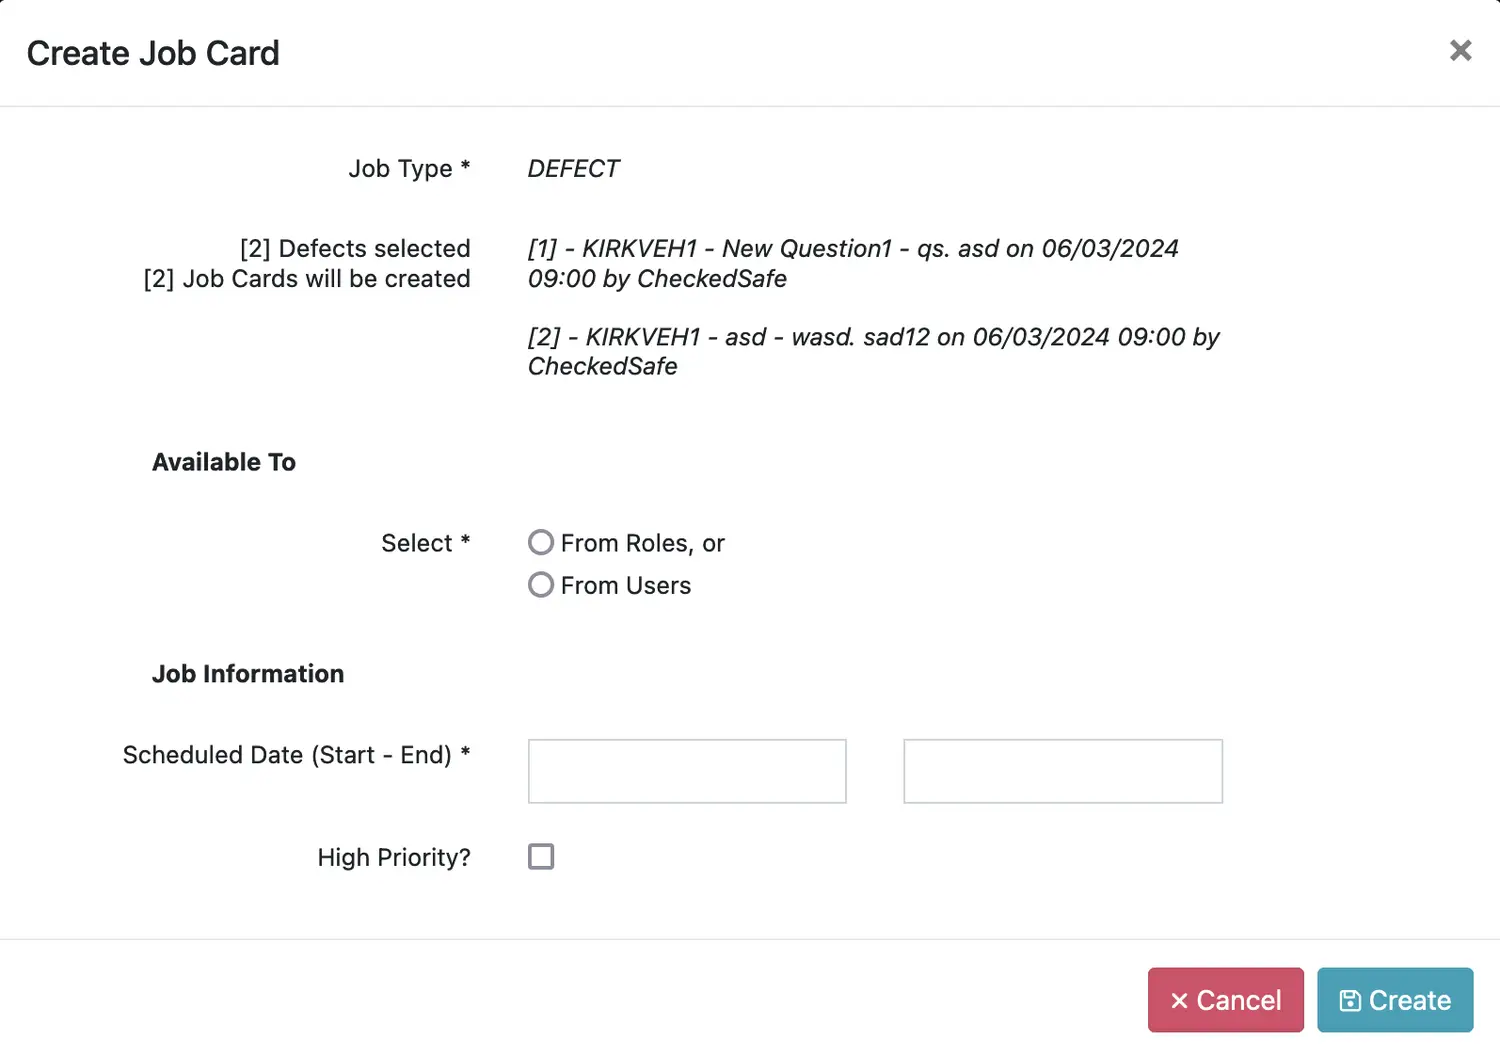
Assign Multiple Job Cards
It is now possible to create multiple Job Cards at once via the Active Defects list screen .
A Job Card can still be created via the View Check Details screen one defect at a time via the assign link:

This update allows multiple defects to be selected:
Once selected, clicking on the “Assign(selected)” button will popup the Job Card dialouge allowing Job Cards to be created for the selected defects:
Viewing Check detail
From the view checks page you can view the details of any check by clicking the blue “View” link at the far right of the table
The top section provides details of:
- Where the user did the check (Map)
- User details (hyperlink back to folder)
- Vehicle details ((hyperlink back to folder)
- Send a quick message to the user
- Timing of check and indication is slow or fast if you have preset times
- Thumbnail photos
- Options to View Gallery (expands the thumbnails), Generate PDF Report (Summary), Generate Excel (Summary), Check as PDF (All Images) – PDF with all photos, Check as PDF (Selected images) – tick the images you wish to include on the PDF, Email Check – email the Check and ODF to anyone you wish

The next section indicates a breakdown of the viewable/printable report:
- The questions
- The answers
- Any defect information reported
- Time stamp each time a question is answered
- Compass movement (or not)
- Managers area for input as to actions against defects
The final view area of the check provides detail of:
- Device used
- Model
- Android or IOS version
- App version
- Camera permission
- GPS permission
Dealing with the Defects
This section details how you can deal with the defects in line with compliance guidelines
Defects require immediate attention by a qualified person(s) and these can be:
- Email sent out to whoever requires the notification from which tasks below can be completed
- Cleared as repaired
- Made Serviceable – still a defect but the vehicle/asset is fit for use and will be fixed/updated later (with this in mind its useful to put as much information into this as possible including actions for the driver such as “This vehicle is fit to use, do not repeat unless defect is worse” that way you will not get a build up of unnecessary repeat defects. The driver or any driver logging into that vehicle will see that defect as serviceable and work accordingly
- Defect open – any driver logging onto a vehicle and a red defect pops up they should not be taking that vehicle they MUST seek advice
- Assign the defect to someone for action – once this has been assigned the person will see it on their device when they log in, they can take action and update from the device, the manage will then see what has been done via the back office – (the same applies if the person logs into the back office and undertakes the same process as a job card completion
Status of defects
Once actions have taken place you can see immediately the status changes on each defect, you can filter all these screen by vehicle by Defect, Serviceable, Cleared – this view is filtered to just look at the defects line by line NOT the actual full check – you can see the full check if you click View at the right side of the screen
Summary of Compliance
At the top of the view check area you will have seen a summary this now starts to flesh out summarising the actions taken and tagging date/time and user so you have a full trail of compliance
Adding docs to checks
This is your final process to ring fence the whole compliance process, uploading a document against the defect, you can upload a receipt, job card, warranty etc.
In the Checks/Inspection notes add a note and attach the relevant file you wish to add once completed that ring fences the note and also files that document and note into the vehicle filing cabinet for future use (it cannot be deleted)

The above section on managing the defect process this is applicable across ALL checks, If a PMI has been completed this is the same process:
- Complete the PMI on a tablet identifying any defects – making notes/taking photos (if the defect can be repaired at the same time add those notes into the fail section
- Once submitted the back office can be updated with what has been done to rectify the defect just the same as managing the pre-use daily check defect
- Uploading documents such as Brake Test, Tacho check etc. is essential as this keeps all the PMI documents in one place and attached
- Once completed the TM can them have a final sign off on the back office to confirm that the vehicle is fit for service

Send a message to the app
There are a couple of options to sending out messages one is via the check

Once you press send the message will pop up on the user’s device.
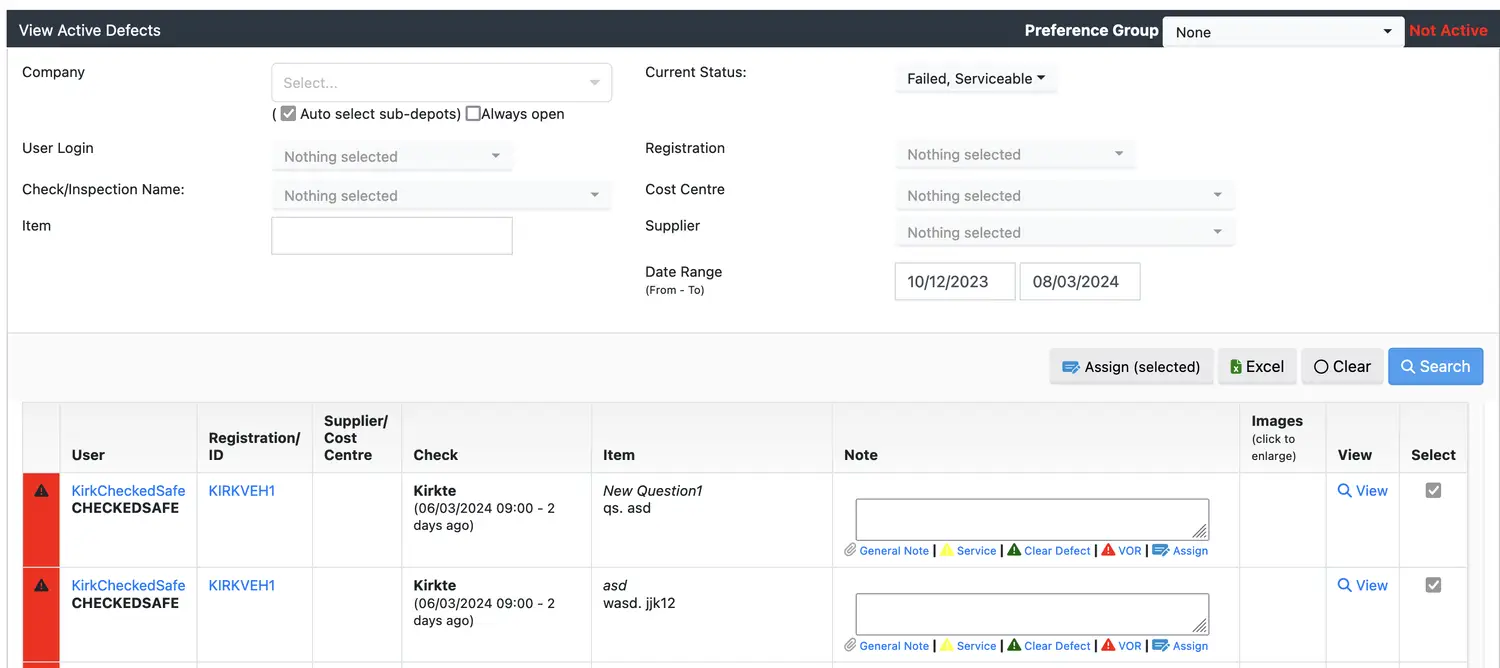
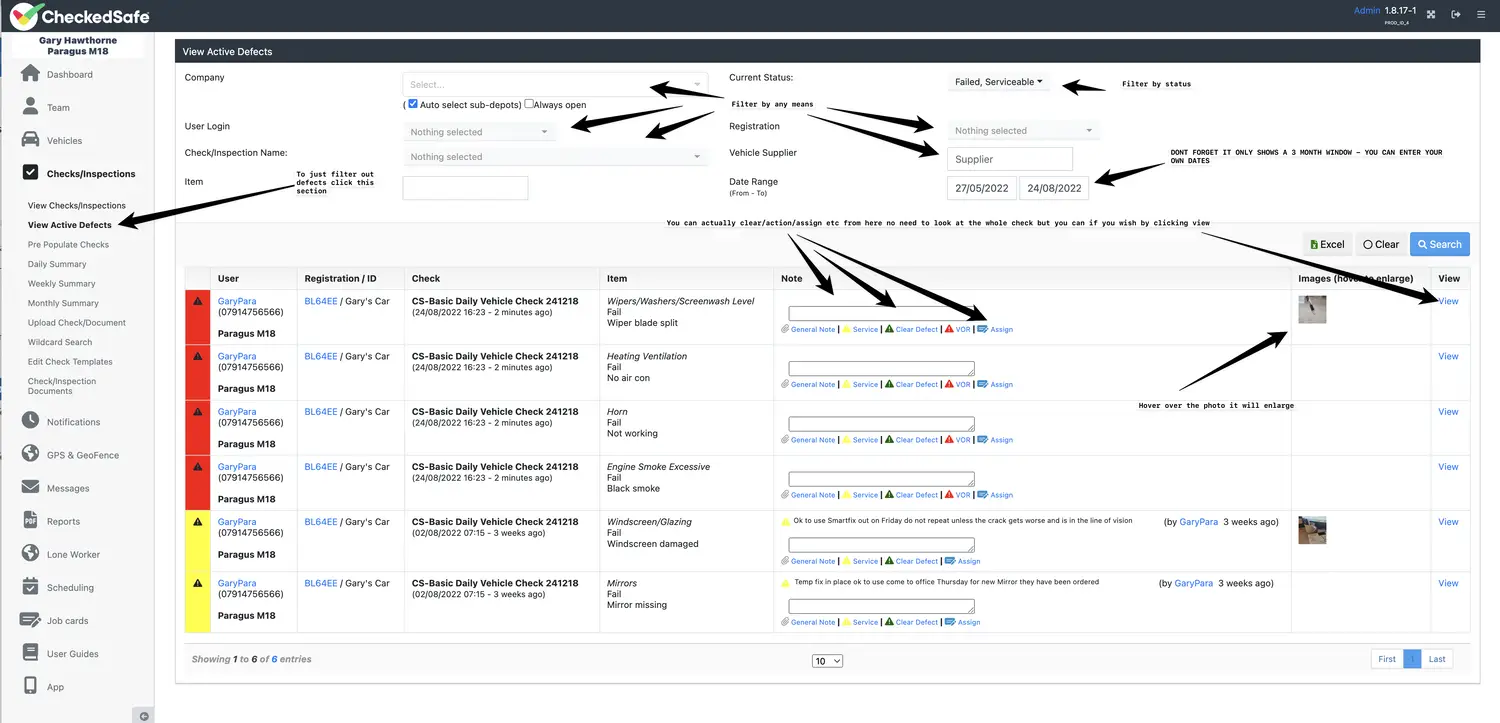
View Active Defects
You can shortcut to viewing defects by clicking view active defects from the left-hand menu, this section pulls all active and/or serviceable defects (you can filter at the top on current status). From here you can action defects Clear/Serviceable/Notes and/or Assign or even look at the original whole check.
You can filter by Depot, User Login, by supplier (very handy if you block hire vehicles from a supplier), by Vehicle Reg and by date range.
Pre-Populated Checks
This section you can pre-populate checks in the template – this can be useful for people who have equipment with serial numbers to check. You can pre populate that serial number to match the user or for anything that you want to be checked.
Choose depot then choose the user or users, then once you have chosen the template to pre-populate it will pop out the lines/questions you can pre-populate.
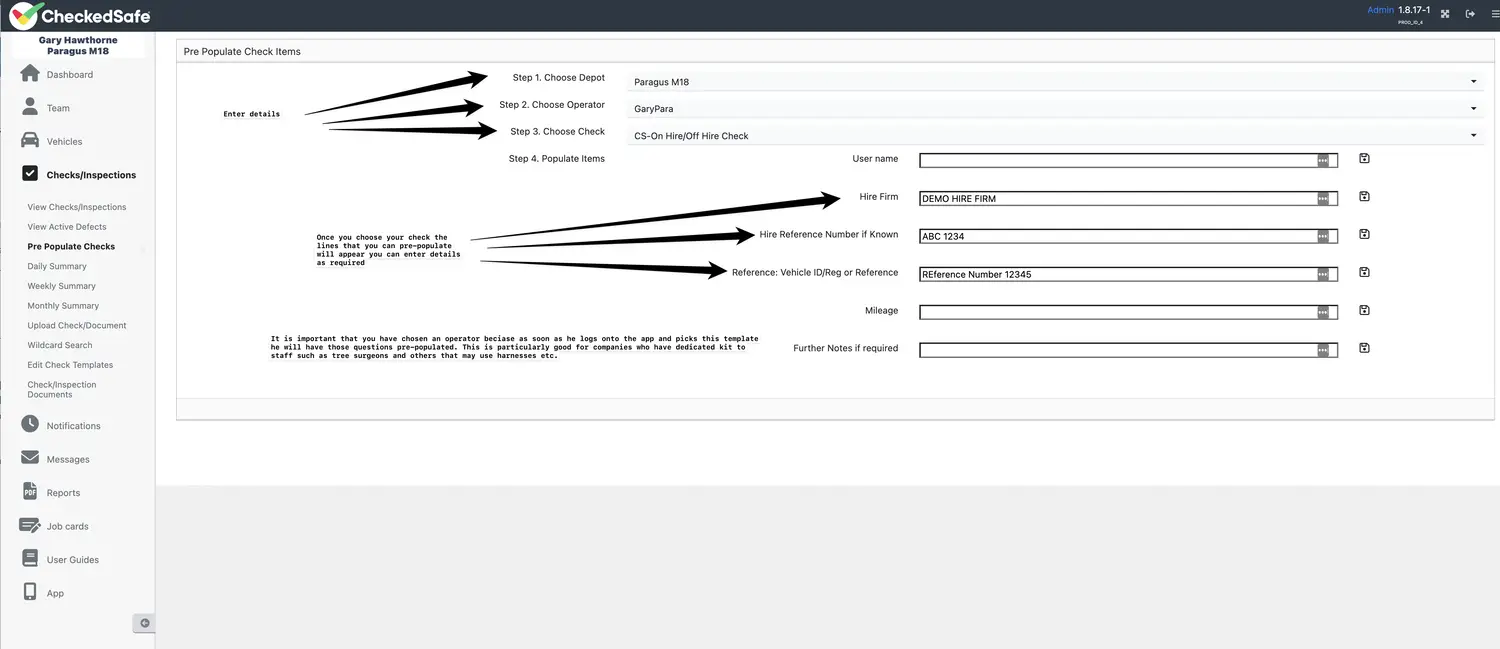
you will need to update this each time if they change and do it for each staff member if the data is different for each one for example if you think of a harness for a tree surgeon, they have numbers unique to each harness tagged to the person.